Facebook Conversion API
Since 2021, we have been offering our Facebook Conversions API integration, and after all these years it deserved an upgrade. We have completely rebuilt the integration and made it compatible with our other server-side efforts by using a custom domain for the tracking server. Follow the instructions below to upgrade your integration or to start using the Facebook Conversions API.

Important: If you have set up our previous Facebook Conversions API integration, disable it before you start setting up the new integration. Otherwise, conversions will be counted twice if both integrations are active at the same time. You can disable the previous integration by going to Merchant > Integrations > Facebook CAPI. There, select the red trash can icon to remove the integration(s) you have set up.
Facebook CAPI via Marketing Tags
The new place for our Facebook CAPI integration is in the most logical place: within the Facebook Pixel marketing tag. One place to configure everything related to tracking with Facebook. Follow the steps below.

Note: It is recommended to use a custom domain for server-side tracking to benefit from all the advantages that the Facebook CAPI has to offer. If you have not yet set up the custom domain for server-side tracking, please check this article.
Facebook Setup
To use the Facebook Conversion API, you need an access token. Follow these steps to generate an access token:
1. Go to the Events Manager in your Facebook Business account. (You can open this by going to the Facebook Business Suite, clicking on 'More tools' in the side menu, and selecting Event Manager).2. Select the pixel you want to use with the Conversion API.3. Go to Settings.4. [Optional step] Scroll to 'Automatic Website Matching' and enable this setting with the toggle. We send hashed personal data to Facebook, which they can use to attribute more conversions to your Meta ads.
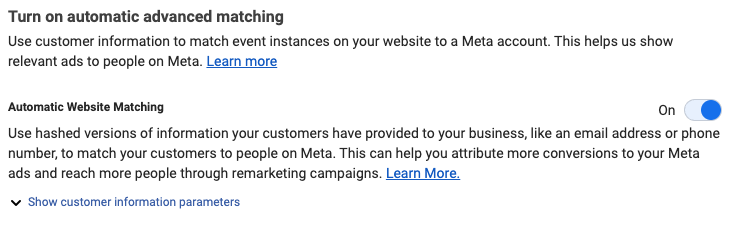
5. Then scroll down to the 'Conversion API' section > 'Set up direct integration' and select 'Generate access token'.

6. Copy this token and store it somewhere safe. Facebook will not save it and you will need this token later.
Facebook Marketing Tag
- Go to the Paylogic backoffice, select your event and go to the Marketing Tags menu.
- Select the 'Facebook Pixel' marketing tag.
- Paste the value of the Facebook access token you obtained from Facebook into the Facebook Access Token field.
- Important: Make sure that the Facebook Pixel ID in the marketing tag is the same Pixel ID as the one for which you created the access token.
- Click 'Save changes'.
- That's it, you have now set up the Facebook CAPI!