Create a Google Analytics 4 funnel
Funnel for one Paylogic shop
When you are on the homepage of your GA4 property, select 'Explore' in the menu bar on the left-hand side.
In the next screen, choose 'Funnel Exploration'.

You will be taken to the next screen and you will see that Google has already filled in some steps. Remove these steps.
Click on the 'MAKE OPEN FUNNEL' toggle so that it is turned on.
Now click on the pencil icon in the 'Steps' section.
Here you can add all the different steps of the purchase process in a Paylogic shop. As an example, we will use our demo shop: https://shop.paylogic.com/094a04f823654cb3a7c2cd39386546b9/tickets. Our shops have a few standard steps that every shop has (add to cart, shopping cart page, checkout page, purchase), but as you may know you can also add your own pages to the shop or even add a questionnaire that can be viewed in the demo shop.
As a first step we add the shop's landing page, in this case https://shop.paylogic.com/094a04f823654cb3a7c2cd39386546b9/tickets. Do this as follows:
Give the step a name, such as the name of the page. In this case 'Tickets'.
Click on 'Add new condition'.
Select 'Events' and then click on 'page_view'.
Now click on the 'Add parameter' button, select 'Other' and click on 'page_location'.
A window will open for the rules of the page_view.
Add the URL of your landing page in the empty field.
Click 'Apply'.
You have created your first step. The rest of the steps can be set up in the same way. As an example, you can see below what the steps would look like for the demo shop:
Accommodation: Events > page_view | Parameter > Other > page_location > https://shop.paylogic.com/094a04f823654cb3a7c2cd39386546b9/accommodation
Merchandise: Events > page_view | Parameter > Other > page_location > https://shop.paylogic.com/094a04f823654cb3a7c2cd39386546b9/merchandise
Extras: Events > page_view | Parameter > Other > page_location > https://shop.paylogic.com/094a04f823654cb3a7c2cd39386546b9/extras
Shopping cart: Events > page_view | Parameter > Other > page_location > https://shop.paylogic.com/094a04f823654cb3a7c2cd39386546b9/shopping-cart
Questionnaire: Events > page_view | Parameter > Other > page_location > https://shop.paylogic.com/094a04f823654cb3a7c2cd39386546b9/questions
Checkout: Events > page_view | Parameter > Other > page_location > https://shop.paylogic.com/094a04f823654cb3a7c2cd39386546b9/checkout

Confirm your steps by clicking 'Apply' at the top right.
You have successfully created your funnel and you can see the data on the right-hand side.
Funnel for multiple Paylogic shops
A funnel for multiple Paylogic shops can be useful if you use one GA4 measurement ID for many different events at the same time. For example, for clubs or concert venues, where every shop has the same setup and the same number of pages.
When you are on the homepage of your GA4 property, select 'Explore' in the menu bar on the left-hand side.
In the next screen, choose 'Funnel Exploration'.
You will be taken to the next screen and you will see that Google has already filled in some steps. Remove these steps.
Click on the 'MAKE OPEN FUNNEL' toggle so that it is turned on.
Now click on the pencil icon in the 'Steps' section.
Here you can add all the different steps of the purchase process in a Paylogic shop. As a first step we add the landing page of the shops. Do this as follows:
Give the step a name, such as 'Discovery' in this case.
Click on 'Add new condition'.
Select 'Events' and then click on 'page_view'.
Now click on the 'Add parameter' button, select 'Other' and click on 'page_location'.
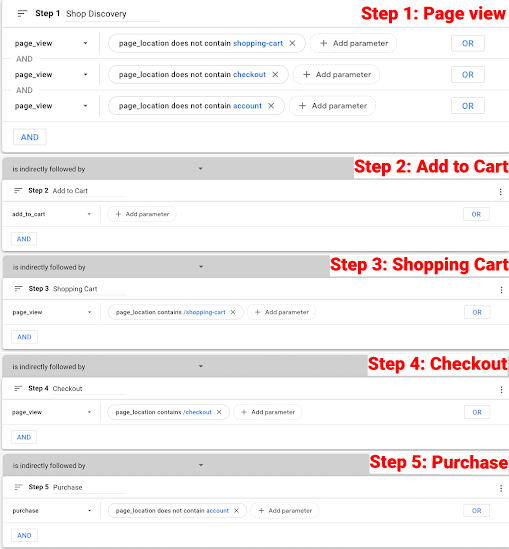
A window will open for the rules of the page_view. What you want to do is make sure that you only include pages with products and no pages from other steps or other applications than the shop. Therefore, select 'does not contain' as the condition and enter 'shopping-cart' in the empty value field.
Click 'Apply'.
Repeat this for 'checkout' and 'account', so that you have 3 conditions for your first step.
As step 2 you can add 'Add to Cart', which is the event when a fan adds a product to their shopping cart in a shop.
Click on 'Add new condition'.
Select 'Events' and then click on 'add_to_cart'.
Step 3: Shopping Cart -> page_location contains /shopping-cart.
Step 4: Checkout -> page_location contains /checkout.
Step 5: Purchase -> page_location does not contain account.
Confirm your steps by clicking 'Apply' at the top right.
You have successfully created your funnel and you can see the data on the right-hand side.
Related Articles
A goal funnel for the Paylogic shop
To correctly set up a Goal Funnel for a Paylogic shop, you need to follow the steps below. Step 1: Create a new goal Step 2: Custom goal configuration Step 3: Goal description name + type Step 4.1 General funnel for all shops The steps within a Goal ...Create a Google Analytics 4 property
Configure Google Analytics 4 in the Paylogic backoffice Go to the event you want to track with Google Analytics 4 and go to theMarketing Tags menu. Select the Google Analytics 4 tag. In the 'Google Analytics Measurement ID' field, enter the ...What do we measure?
Google Analytics 4 When you have configured a Pixel ID for the Google Analytics 4 pixel, we automatically send the following events/triggers to your GA4 pixel: pageview: Is sent for each page view in a shop or on My Order. add_to_cart: Is sent each ...Pinterest Tag – Installation and Guide
By configuring the Pinterest tag directly in the Paylogic Backoffice, you can easily track fan behaviour and conversion events in your shop that originate from Pinterest. Steps to set up the Pinterest tag: Log in to your business Pinterest account or ...Server-side Tracking
With our server-side tracking solution, we help you gain better insight into the online behavior of your fans, so you better understand how your marketing campaigns are performing and how they move through your ticket shop. Unlike traditional ...